
ABAP WORKFLOW
Contents:
- Introduction to Workflow
- Object Types And Delegation of Objects
- Creating Custom Tasks and Event
- Creating Workflow.
- Integrating Custom task, SAP defined activities in Workflow.
- Important T Codes
- Conclusion
ABAP WORKFLOW :-
Workflows have 2 main purposes:-
To streamline a business process to make it faster.
To ensure that a business process is executed correctly.
A workflow formally defines and implements a business Process.
Real Time scenarios for Workflow Uses:-
A workflow management system facilitates the electronic processing of structured processes that :
Include a number of activities
Always occur in a similar or identical form
Involve several people or departments, and
Require a high degree of coordination
Workflow management systems control processes according to a predefined model and are particularly suitable for structured organizations
Workflow related Topics to be known:-
Object Type
Object Subtype, Attributes, Methods, Events for Objects, Delegation of Objects
Creating Custom Tasks, Background Task
Event Linkages with tasks and Workflow
Difference between Task Container and Workflow Container
Things to Remember :-
Workflow is not
Standard e-mail and groupware (but workflow can work with these)
Data distribution across several systems (but workflow supports this ALE and EDI option)
Effectiveness of Workflow:-
For User
Faster, Simpler access to information
Administrative tasks are less demanding
Processes are easier to learn and understand
For Management
Better control over
Information
Deadlines
Service levels
Process costs
Flexibility in changing
Processes
Organizational structure
Underlying technology
For Enterprises
Increases production
Backlog reduction
Distribution of information and work
Speeds up processes
Cash discounts more often
Better/faster reaction to errors
Increases customer satisfaction
Processes completed more quickly
Better information flow
Scenario:-
After Creating Purchase order, a customized table should automatically get updated with required values.
(This document explains steps to create workflow in 4.6 versions.
There are small modifications is ECC6.0 and later versions)
Pre Requisite steps:-
Step 1:-
There are small modifications is ECC6.0 and later versions)
Pre Requisite steps:-
Step 1:-
Create table with required fields.

Step 2:-
Create a function module which will fetch data from EKKO (Purchase Document Number) table and update created table.

Step 3:-
Please check whether the client and server which you are working on have a Prefix Number Entry in table T78NR.
To check these go to transaction SPRO. Reach out to path-
Basis Components –>Business Management ->SAP Business Workflow –> Basic Settings->Maintain Prefix Number
If the table does not have entry please create an entry with unique number not already used in the table.
Step 4:-
Create one Customizing Transport Request and one Workbench request using Transaction SE10.
Now we are ready to create Workflow and Related Objects.
Generic Overview of scenario:-
Creation of Purchase Order
On Save - Event get fired (Purchase Order Created)
Event triggers Workflow
 Workflow Executes steps - Tasks assigned to those steps.Tasks Execute functions or methodsFunction Module Executed
Data is stored in Customized Table.
Creating Object Types:-
Go to Transaction SWO1 and search for Object or Interface Type Related to Purchase order.
E.g. BUS2012
E.g. BUS2012

Check whether the object or interface type contents required event in current scenario it’s ‘Create’.

As we can see there is no Event related to ‘Create’ Event.
So now we need to define our own Object Type and Use it to complete task.
Go back to first screen and click on the Button .
.
 .
.
Fill in all fields and then press enters which will create a new subtype of BUS2012 and will inherit all the Attributes, Methods and Events of Super Type.

Now in this Subtype we can add our own Interfaces, Attributes, Methods and events.

Reference diagram from SAP AG explaining Relationship between ‘Super type’ and ‘Subtype’

Here I have added a new method named ‘FILL_DATA’ and an Event ‘Created’ for my Subtype.
Now let us go to detail of how to create new methods or events or Attributes.
Point the Cursor on the place where you want to add new functionality. E.g. Methods
Click on create button which will give you Popup window asking  Press no and it will show another window
 Press no and it will show another window
Fill in all required details and press enter.

Method Name
Name and Description
If you want users to execute this method select dialog or if you want it perform as a background task leave it blank.
Synchronous:
Instance independent:
Switch to tab ABAP. Select function module radio button and give name of function module you created before which will fetch data from EKKO and update in custom table.

If you want to see program keep cursor on method created and press button 

You will see window like this.
Note: This is old ABAP Editor. There is no workaround for this to make it in normal editor as of now.
Note: This is old ABAP Editor. There is no workaround for this to make it in normal editor as of now.

It’s nothing but FM call. So now we have to give Import parameter as Key of the Object Type which we have created.


Press save and go back to object type window
Now we will create Event ‘Created’
As while creating method keep cursor on ‘Events’ and click on create button which will lead to following window.
Now we will create Event ‘Created’
As while creating method keep cursor on ‘Events’ and click on create button which will lead to following window.


Fill in the required detail
Now save Object with Workbench request in a development class.
 Now, keep cursor on created method and go to
 Select ‘To Implemented’ then select ‘To Released’
Repeat steps for Events.
After this Go to Object Type à and select first ‘To Implemented’ and then ‘To released’.
Save object prompt will appear again. Save it and then click on ‘Generate Button’ 

This should give message in status bar 

If any error message then please check the code of method and do the Implement and Release steps again.
Now we are ready with out Object Type with Customized method and Event for our scenario.
Creating Task:-
Select Create Task from Sap Easy Menu

 Fill in the details and click on new button
Here I have created task called ZT_WFTRN. And in the Object Method gave Object type as our created Object type and Method for which this task is implemented.

We can have different setting is all the tabs available in Task Creation.
Basic Data I have already shown above.
Description is nothing but Documentation about the task
Alternating methods: here we can define any alternating method than the given default method in Header data section (It might be useful when we want to use same task to work differently on different conditions.)
Triggering Events and Termination Events:
As names suggest these are the starting and ending conditions for out task.

This is the place where we Link Method with our Event.
This means now every time when Event occur the method will be executed.
Don’t forget to Click on the . This will activate the Event but before that it will ask you to save this event linkage. Use your Customization task and save it.
 . This will activate the Event but before that it will ask you to save this event linkage. Use your Customization task and save it.
Terminating event can be used to stop execution of the Event in certain conditions
Now save the task and press Container button.

Click on create button and create new container with Our Object type created for Workflow.
Save it and come back. Save Task Again.
Now we are ready with Task remaining part is Creation of workflow and linking this task to Workflow.
Before that let’s take a insight on ‘Container’.
Containers are nothing but the Variables in the Workflow that hold the values in the workflow. They can be simple variables or structures or even objects of any class. So they are best treated as the variables.

You can also see a button on the taskbar with 

Here we can give default values for task to work if we don’t want to manually give it while execution of task.
For this task since we will be calling this thro’ workflow we are keeping it black.
One can choose the task to be as background task.

Also we can select other checkboxes which are Executable as form means which will run in foreground and If confirm end of processing is checked then it will ask for user input while ending task.
Please change status of task to Released without fail before saving.

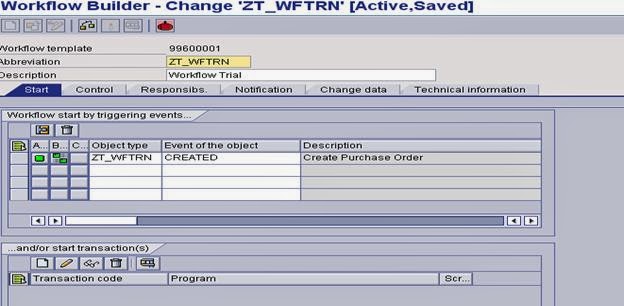
Creating A WORKFLOW
Now we are ready with all the basic need to create our main Workflow.
So now we will go to T-Code SWDD. (Work Flow Builder)
Click on new button and you will see screen like this…

This is our workflow main station.
Left hand side of screen we can see explorer like navigation area which will list down all the steps in Workflow.
Just below navigation area we can see workflow container.
Now go to workflow container and Double click to create new Container for Workflow same as we have created for Task with new name. I have created ZWF_container for workflow.

At the right hand side bottom we can see all the types of Activities we can do.
Double click on undefined task white arrow in workflow and pop up occurs.
Which list all the steps which we can select -
Activity – Giving customized created task as execution step for workflow
Condition and Multiple Condition – Like IF ELSE statement and Case statement
Fork- is for running two tasks concurrently and then upon successful execution of both the tasks move forward for the next step. (Same as Linux FORK () and Child ())

Send mail- will trigger a mail to desired recipients.
Also in workflow we can have two Loop as we can see Loop (Until) and Loop (while)
Now we will select Activity in our scenario which will show us this page,

Give created task in the format of TSXXXXXXXXX where xxx is your task number which we have created in the section above.

After giving task press Button Binding.

This binding will bind the Task Container and Workflow container so that task gets executed with the values which are exported from Workflow.
After this go to Agent assignment where we can see button with apple on it.


 Click on generate button.
Since this is background task we don’t have to give any specific agents or users to execute this task.
If it’s not a Background or Multiple tasks we can assign agents which will execute the task

Agent can be Expression, Role, Organization Unit, Job, User, Or Work center.
After this please save the task by clicking  right button which will again take you to the workflow main screen.
 right button which will again take you to the workflow main screen.
Now we are almost ready about our workflow but still one most important thing is missing.
Trigger to start this Workflow i.e. event by which this workflow will be called and which in turn execute the task.
So now we will see how to Link Events to workflow.
Before that go to 

And maintain entry for the Change Document related to Purchase Order i.e. EINKBELEG by clicking on new entry.
(This is a Cross client table) (We can find Change document related to Purchase order searching in define workflow properties)
(This is a Cross client table) (We can find Change document related to Purchase order searching in define workflow properties)

We will have to go to Workflow header by pressing  header button
 header button
This will take us to screen 
Now here we are giving our own created Event which is ZT_WFTRN- created (which will get triggered after creating any purchase order.
Press ‘Activate’ button and also binding button just next to task.

Here we can see one more column which I did not explain before now we will see what this is. It’s nothing but a condition specification column. Here we can give some more conditions to be checked before executing workflow after event has occurred.

Press Agent assignment button again here and then press generate. Come back to workflow. Save and Activate workflow.
Now we are ready with All the Required Objects ready and workflow ready.
Execution
Whole purpose of this Scenario was to update a Customized table just after creating Purchase order.
So we will now create a purchase order and then check our customized table.

And then check table which has this purchase order

So that’s it. Our First Workflow is complete.
Additional Information and Tracking
If some error has occurred and our table is not updated first thing we can check is whether the event was fired or now.
We can see this using session SWEL (SAP WORKFLOW EVENT LOG)

Give Event Name in Filter or Object name which we created and then execute which will give a report.
We can see event did occur

And in the receiver type the name was given as Workflow which we created. Also Green Square shows that event was successful.
So we are sure that event was fired and data was properly given to the workflow so now we can check whether the problem was in workflow and task.
Double click on event and we will be on the screen

Click on work item and then click on Workflow Log.

Click on List of technical details and check whether error occurred anywhere. In this case since it was successful execution nothing will be in Error.

If any error we can just click and check the error.
Most of the times errors are about the binding of the Task and Workflow
So please check all the steps are executed properly
Task binding
Agent assignment
Event Binding
Event agent assignment
Data type of all the containers should be same.
Conclusion
So here we are ready with out first workflow.
We can add any number of tasks in this workflow. Also we can trigger same workflow from different events such as changed, display.
Useful Transaction Codes
Area Code SWLD lists all transactions associated with Business Workflow.
SWDD - Main Workflow Builder
PFTC - General task maintenance
SWO1- Business Object Builder
SBWP- The Business Workplace SWDM - Business Workflow Explorer
SWELS - Switch Event Trace On/Off
SWETYPV - Display/Maint. Event Type Linkages
SWUS - Test Workflow
SWUI - Start Workflow
SWI6 - Workflow for Objects
SW14 - Workflows for Objects Types
SWDB - Workflow Builder - Create Workflow
SWLV - Maintain Views
TASK/TASK GROUPS
PFTC_INS - Create
PFTC_CHG - Change
PFTC_DIS - Display
PFTC_COP - Copy
PFTC_DEL – Delete
T-codes Related To Events
Events Creation
BSVW - Status management
NACE - Message Control
AWUW - Logistics Information System (LIS)
Event Linkages
Work item analysis
SWI2_FREQ - Work Items per Task
SWI2_DEAD - Work Items with Monitored Deadlines
SWI2_DURA - Work Items by Processing Duration
Task analysis
SWI11 - Tasks in Workflows
SWI13 - Task profile
Function modules used in Workflow:
SWW_ADDR_KEY_CREATE_FROM_USER “display the address of the user or recipient
SWW_WI_DELETE “delete work item
SWW_WI_CREATE_VIA_EVENT “create work item as result of event
SWW_WI_DEADLINE_CHANGE “change of deadline attribute of work item
SWW_WI_COMP_EVENT_RECEIVE “complete work item using events
SWW_WI_REJECT ”reject work item
SWW_WI_EVENT_RECEIVE “retrieve event for a workflow
SWW_WI_DISABLE “lock work item against execution
SWW_WI_ENABLE “remove lock against execution of work item.